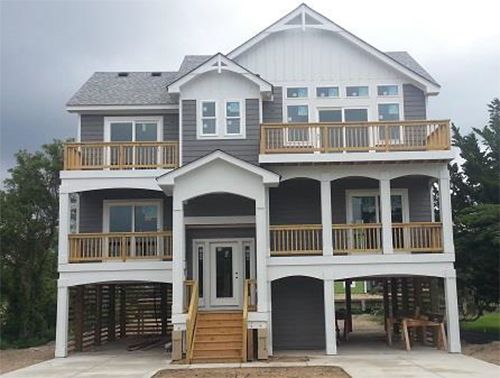
There is no greater time to inspect your deck prior to having all your friends and family over for outdoor fun. We thought it would be beneficial to our homeowners to have a simple deck inspection guide that would help you recognize some potential hazards and maintenance issues that may need addressed.
Checking your deck using this information does not constitute a code compliant deck. It is intended to assist homeowners to seek a professional such as a building contractor or licensed home inspector to get a deck evaluation.
Inspecting Your Deck
Here are some helpful tips when it comes to inspecting an existing deck for structural safety.
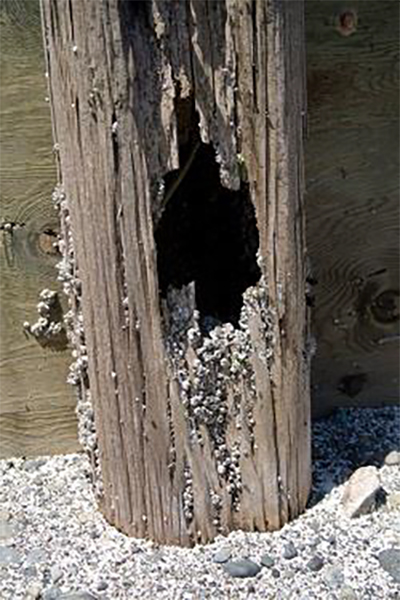
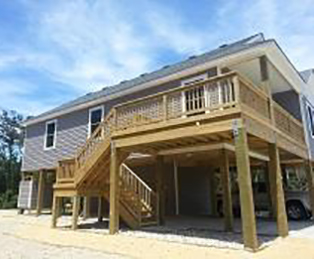
1. Investigate the deck support posts/pilings
Simply dig around the post/pilings and look for rot or bug damage. Also inspect the pile above ground for dry rot, cracking or splitting. A simple way to inspect for rot is to poke the wood with a screwdriver or ice pic. If you can easily penetrate ¼ – ½ inch, break off a sliver of wood without splinters, or the wood is soft and spongy, decay may be present. You should visually inspect all deck components (joists, girders, deck boards, guardrails, and stairs).

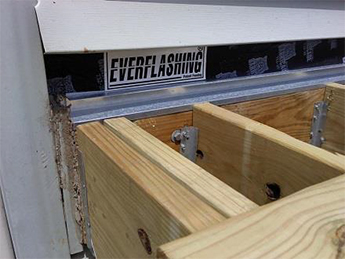
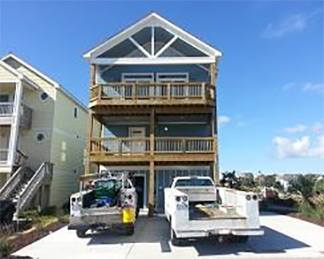
2. Deck attachment to house
Improper flashing may lead to water infiltration and rot over time. It will eventually lead to structural issues. Flashing should run from top to bottom of deck band between the house and deck band. There should be counter flashing on the house that bends over deck band and joists. Then the house wrap would go over the counter flashing next. This can be hard to see after a deck is already built.
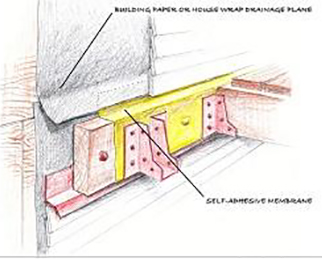
3. Check the flashing at the house
Improper flashing may lead to water infiltration and rot over time. It will eventually lead to structural issues. Flashing should run from top to bottom of deck band between the house and deck band. There should be counter flashing on the house that bends over deck band and joists. Then the house wrap would go over the counter flashing next. This can be hard to see after a deck is already built.
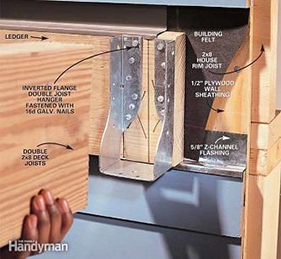
4. Proper joist support
Joists can be supported by either a ledger board or by joist hangers. Things to look for concerning joist hanger problems. Nails are supposed to be installed in every hole with proper nails. Most screws are not approved for joist installation. Joist hangers shouldn’t be bent or cut. Change rusted joist hangers. The joists should be seated fully in the joist hanger. A minimum 2” x 2” ledger with 3 – 16 d nails spaced 4” on center under each joist is the other method of supporting the joist.

5. Grider & Joist spans
| Species | Size | Deck Joist Span Less Than or Equal to: (feet) |
||||||
| 6 | 8 | 10 | 12 | 14 | 16 | 18 | ||
| 2 – 2 x 6 | 6-11 | 5-11 | 5-4 | 4-10 | 4-6 | 4-3 | 4-0 | |
| 2 – 2 x 8 | 8-9 | 7-7 | 6-9 | 6-2 | 5-9 | 5-4 | 5-0 | |
| 2 – 2 x 10 | 10-4 | 9-0 | 8-0 | 7-4 | 6-9 | 6-4 | 6-0 | |
| 2 – 2 x 12 | 12-2 | 10-7 | 9-5 | 8-7 | 8-0 | 7-6 | 7-0 | |
| 3 – 2 x 6 | 8-2 | 7-5 | 6-8 | 6-1 | 5-8 | 5-3 | 5-0 | |
| 3 – 2 x 8 | 10-10 | 9-6 | 8-6 | 7-9 | 7-2 | 6-8 | 6-4 | |
| 3 – 2 x 10 | 13-0 | 11-3 | 10-0 | 9-2 | 8-6 | 7-11 | 7-6 | |
| 3 – 2 x 12 | 15-3 | 13-3 | 11-10 | 10-9 | 10-0 | 9-4 | 8-10 | |
| Douglas fir-larche, hem-fire, spruce-pine-fire, redwood, western cedars, ponderosa pinef, red pinef | 3 x 6 or 2 - 2 x 6 | 5-5 | 4-8 | 4-2 | 3-10 | 3-6 | 3-1 | 2-9 |
| 3 x 8 or 2 - 2 x 8 | 6-10 | 5-11 | 5-4 | 4-10 | 4-6 | 4-1 | 3-8 | |
| 3 x 10 or 2 - 2 x 10 | 8-4 | 7-3 | 6-6 | 5-11 | 5-6 | 5-1 | 4-8 | |
| 3 x 12 or 2 - 2 x 12 | 9-8 | 8-5 | 7-6 | 6-10 | 6-4 | 5-11 | 5-7 | |
| 4 x 6 | 6-5 | 5-6 | 4-11 | 4-6 | 4-2 | 3-11 | 3-8 | |
| 4 x 8 | 8-5 | 7-3 | 6-6 | 5-11 | 5-6 | 5-2 | 4-10 | |
| 4 x 10 | 9-11 | 8-7 | 7-8 | 7-0 | 6-6 | 6-1 | 5-8 | |
| 4 x 12 | 11-5 | 9-11 | 8-10 | 8-1 | 7-6 | 7-0 | 6-7 | |
| 3 – 2 x 6 | 7-4 | 6-8 | 6-0 | 5-6 | 5-1 | 4-9 | 4-6 | |
| 3 – 2 x 8 | 9-8 | 8-6 | 7-7 | 6-11 | 6-5 | 6-0 | 5-8 | |
| 3 – 2 x 10 | 12-0 | 10-5 | 9-4 | 8-6 | 7-10 | 7-4 | 6-11 | |
| 3 – 2 x 12 | 13-11 | 12-1 | 10-9 | 9-10 | 9-1 | 8-6 | 8-1 | |
For SI: 1 inch = 25.4 mm, 1 foot = 304.8 mm, 1 pound per square foot = 0.0479 kPa, 1 pound = 0.454 kg.
- Ground snow load, live load = 40 psf, dead load = 10 psf,= 360 at main span, = 180 at cantilever with a 220-pound point load applied at the end.
- Girders supporting deck joists form one side only.
- 2 grade, wet service factor.
- Girder depth shall be greater than or equal to depth of joists with a flush beam condition.
- Includes incising factor.
- Northern species. Incising factor not included.
| Table 12 Wet-Service Floor Joists - 40 PSF Live Load, 10 PSF Dead Load, 360 Deflection | |||||||||||
| Size inches | Spacing inches on center | ||||||||||
| Visually Graded | Machine Stress Rated (MSR) | Machine Evaluated Lumber (MEL) | |||||||||
| DSS | No. 1 | No. 2 | No. 3 | 2400f-2.0E | 1650f-1.5E | 1500f-1.6E | M-14 (1800-1.7) | M-29 (1550-1.7) | M-12 (1600-1.6) |
||
| 2X6 | 12.0 | 11-0 | 10-4 | 9-11 | 8-2 | 11-2 | 10-2 | 10-4 | 10-7 | 10-7 | 10-4 |
| 16.0 | 10-0 | 9-5 | 9-0 | 7-1 | 10-2 | 9-2 | 9-5 | 9-7 | 9-7 | 9-5 | |
| 19.2 | 9.4 | 8-10 | 8-6 | 6-5 | 9-6 | 8-8 | 8-10 | 9-0 | 9-0 | 8-10 | |
| 24.0 | 8-8 | 8-2 | 7-7 | 5-9 | 8-10 | 8-0 | 8-3 | 8-5 | 8-5 | 8-3 | |
| 2X8 | 12.0 | 14-5 | 13-8 | 13-1 | 10-3 | 14-8 | 13-4 | 13-8 | 13-11 | 13-11 | 13-8 |
| 16.0 | 13-2 | 12-5 | 11-10 | 8-11 | 13-4 | 12-2 | 12-5 | 12-8 | 12-8 | 12-5 | |
| 19.2 | 12-4 | 11-7 | 10-10 | 8-2 | 12-7 | 11-5 | 11-6 | 11-11 | 11-11 | 11-8 | |
| 24.0 | 11-6 | 10-4 | 9-8 | 7-3 | 11-8 | 10-7 | 10-10 | 11-1 | 11-1 | 10-10 | |
| 2X10 | 12.0 | 18-5 | 17-5 | 16-2 | 12-6 | 18-9 | 17-0 | 17-5 | 17-9 | 17-9 | 17-5 |
| 16.0 | 16-9 | 15-10 | 14-0 | 10-10 | 17-0 | 15-6 | 15-10 | 16-2 | 16-2 | 15-10 | |
| 19.2 | 15-9 | 14-8 | 12-10 | 9-10 | 16-0 | 14-7 | 14-11 | 15-2 | 15-2 | 14-11 | |
| 24.0 | 14-8 | 13-1 | 11-5 | 8-10 | 14-11 | 13-6 | 13-10 | 14-1 | 14-1 | 13-10 | |
| 2X12 | 12.0 | 22-5 | 21-2 | 19-1 | 14-9 | 22-10 | 20-9 | 21-2 | 21-7 | 21-7 | 21-2 |
| 16.0 | 20-4 | 19-1 | 16-6 | 12-10 | 20-9 | 18-10 | 19-3 | 19-8 | 19-8 | 19-3 | |
| 19.2 | 19-2 | 17-5 | 15-1 | 11-8 | 19-6 | 17-9 | 18-1 | 18-6 | 18-6 | 18-1 | |
| 24.0 | 17-10 | 15.7 | 13-6 | 10-5 | 18-1 | 16-5 | 16-10 | 17-2 | 17-2 | 16-10 | |
Over spanned joists are dangerous as well. Measure your joists and review the table below to see how your joists compare to today’s codes. Also keep in mind the age of your joists and new lumber spans may not make those spans today.
This table would be for deck joists with a 40-pound live load with a 10-pound dead load:
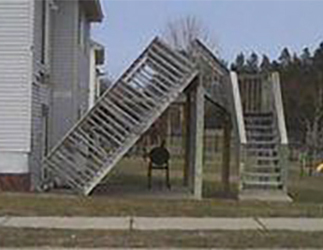
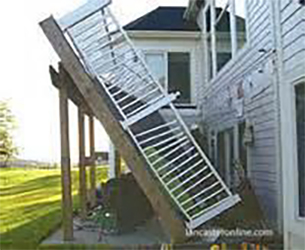
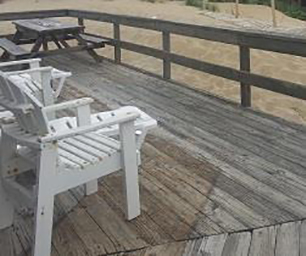
6. Stairs and Guards
Check any guardrails or handrails to be sure they are firmly held in place. Also check the risers and stringers to be certain they are securely attached and not decayed. If the riser of the stair treads is open, this opening should not allow a 4” sphere to pass through. The horizontal stair run of the stairs should not exceed 7’ without additional support. Also, always keep stair pathways clear of planters, décor, toys, and other items that can present a tripping hazard.
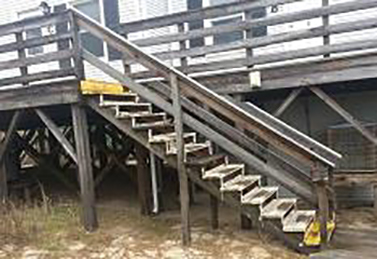
Guards and rails should be secure. This is especially important the higher your deck is off the ground. Maximum post spacing for the guardrail is 8’ on center post to post with two 3/8” through bolts connecting to deck. Handrail height is 34” – 38” inch high measured vertically from a line connecting the leading edges of the stair tread. Guardrail height is a minimum 36 “high above the deckwalking surface. Vertical picket spacing shall not allow for a 4” sphere to pass through. Horizontal members in the guardrail assembly shall not allow for a 4” sphere to pass through. Required guards shall not have openings from the walking surface to the required guard height which allow passage of a 4” sphere. (Pickets on the open side of stairs may have a maximum opening of 4 3/8”.)
Here are few other items to consider as it relates to the deck area:
- Decks supporting hot tubs need to be evaluated by an engineer to ensure the deck can properly support the additional loading. Hot tubs should never be placed on an existing deck that has not been evaluated for the new loads that will be imposed on it.
- If you have trees overhanging your deck, make certain there is no danger of decaying limbs breaking free and falling from trees surrounding the deck.
- Clean away any leaves and debris, since these can be slippery and promote mildew.
- If mildew is present or the deck coating has worn away, make time to clean and apply a new water proofing coating. It can help prevent the split, decayed wood and loosened fasteners mentioned earlier.
- Be sure all lighting is working; clean any light covers to allow maximum light to shine through, and trim any plants or tree limbs that may be blocking light.
- If you don’t have adequate lighting, there are a lot of great new deck lighting products you could consider to illuminate your steps and pathways.
- Be sure all electrical outlets are GFCI protected with the proper weather proof cover intact.
- Test all outdoor furniture to be sure it is sturdy. Avoid placing seating right at the edge of the deck.
Helpful links for deck construction information
Appendix M of the 2018 North Carolina Residential Code available online at our website www.currituckgoverment.com or in our offices.
www.ncdoi.gov
www.NADRA.org
Please note that all components of a deck that are structural and any repairs that include structural members (post, girders, joist, and stair stringers) will require a permit. The replacement of pickets, railings, stair treads and decking of porches and exterior decks that do not exceed $20,000 do not require a permit. For more information, questions, or concerns, please contact a
building inspector at:
For more information, questions or concerns, please contact a building inspector at:
Mainland Office
252-232-3378
Richard Godsey
Ronald Schaecher
Sean Strydom